To edit a command added by CopyFilenames Pro to the Windows Explorer right-click context menu, use the Configure command to bring up the Configure CopyFilenames Pro dialog.
Select the command you want to edit, and it's editable attributes will be shown.
If the selected command is a built-in command, the only editable attribute will be its name.
If the selected command is a user defined command, then you can configure the text that the command will generate.
All commands have the Type and Name fields, as described below.
Type
This is a non-editable field that gives the command type. This will either be one of the built in command types, or "User Defined Command".
Name
This is the name of the command as it appears in the Windows Explorer context menu.
If you include "(s)" in the name, then this will be replaced by "s" if more than one file or folder is selected when the command is display, or nothing if exactly one file or folder is selected.
Editing User-defined Commands
The following screenshot shows a user defined command selected in the Configure CopyFilenames Pro dialog:
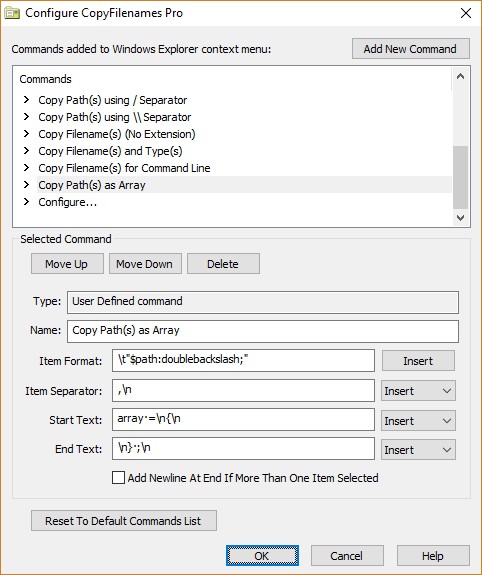
The command shown selected is the Copy Path(s) as Array command that is one of the default commands added when CopyFilenames Pro is installed. This is quite a specialized command that is only of use to programmers, but it is useful as an example since it shows the flexibility of a user defined command. See the end of this topic for a complete explanation of what text this user defined command generates.
The following selections describe each attribute and how it can be edited.
Note that in these fields, spaces are shown as a small centered dot (•). This is just so that you can see where spaces have been entered. When the command is used, any spaces will appear as normal.
If you want to add a control character such as a newline or tab into any of these fields, you need to enter a backslash followed by a letter as shown in the following table.
\n |
Linefeed character (newline) |
\r |
Carriage return character |
\t |
Tab character |
\\ |
A single backslash character |
You also need to enter two backslash characters if you want to enter a backslash character in any of these fields.
Item Format
This controls what text is generated for each selected file or folder.
File attributes (size, date etc.) are added by including the text $name; where name is the name of one of the file attributes. Some file attributes can be further configured, in which case certain options can be added after the name and before the ;.
However, you don't need to remember this syntax since you can just press the Insert button next to the Item Format field. This brings up this dialog that lets you add a new file attribute:
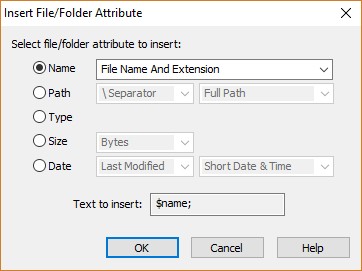
Select the file attribute you want to add and press OK. The appropriate text will be added at the current insertion point in the Item Format field.
Name |
The name of the file or folder. You can select whether the name includes the extension or not, or you can select just the extension. |
Path |
The path to the file or folder. You can select whether the folders in the path are separated by \, \\ or /. You can also select whether the path is the full path to the selected file or folder, or just the path to the folder containing the selected file or folder. |
Type |
The file type. This is based on the file extension. |
Size |
The size of the file. This can be in Bytes, KBytes (1KB = 1,024 bytes), MBytes (1MB = 1,024 KB) or GBytes (1GB = 1,024 MB), or you can select Auto which automatically select the units. When Auto is selected, the units selected will be added after the size, which will be shown as B for bytes, K for KBytes, M for MBytes or G for GBytes. |
Date |
The date/time of the file. You can select whether the date added is the Last Modified date (the date the file was last changed), the Last Accessed date (the date the file was last read), or the Created date (the date on which the file was created). You can also select how the date is shown. This can be one of Short Date & Time, Long Date & Time, Short Date or Long Date. The short and long dates are shown as configured in the Regional and Language Options section of the Windows Control Panel. Typically short dates are shown using a number for the month, and long dates are shown using the month's name. |
Any other text is included as entered. This is used in the Copy Path(s) as Array example above to start the text for each item with a tab, and to enclose the path to each item in double quotes.
Note that in the Item Format field only, since $ is used to indicate the start of a file attribute, if you really do want to have a $ character in the text generated you need to add a backslash before it, i.e. \$.
Item Separator
This controls what text separates the text generated for each file or folder. This is typically a newline, tab or space. To enter a newline or tab at the current text insertion point in this field, you can use the drop down list to the right of this field. Alternatively, you can simply enter \n for newline or \t for tab.
The item separator is added between the text generated for each file or folder, but it is not added after the last item. This means that if you have only one item selected, then the item separator text will not appear in the text generated. If you want the item separator text after the last item as well, then enter the same text in the Item Separator and End Text fields.
Start Text
This allows you to set some text that is added to the start of the text generated.
End Text
This allows you to set some text that is added to the end of the text generated.
Add Newline At End If More Than One Item Selected
If you check this box, then a newline is added after the last item (but before any end text) if more than one file or folder is selected.
This can be used to give the behavior that if a single item is selected, the text is generated on a single line (with no terminating newline), but if more than one item is selected then one line of text is generated for each item and the last line also ends with a newline. To achieve this, as well as checking this box, you need to set the Item Separator text to be a newline.
Errors in the Item Format
If you edit the text added when you use the Insert File/Folder Attribute dialog, you can cause errors (i.e. the text between the $ and ; of an item attribute). This can also happen if you enter a $ character without escaping it with a backslash (i.e. without entering it as \$). If this happens you will see this warning symbol next to the command in the list, and next to the Item Format field when that command is selected:
![]()
Press the warning button and a message will pop up that describes the error.
If you press OK when any of the commands have a warning symbol next to them, those commands will not appear in the Windows Explorer context menu.
Example
The example command Copy Path(s) as Array that is shown in the screen shot above generates text like this:
array =
{
"C:\\Users\\Mark\\Documents\\Example1.txt",
"C:\\Users\\Mark\\Documents\\Example2.txt"
} ;
The following table explains how each field is used to get this result.
Field |
Value |
Description |
Item Format |
\t"$path:doublebackslash;" |
The text generated for each item starts with \t, a tab character. This is followed by a " (double quote). The text from the $ to the ; is an item attribute, in this case it is the full path to the item, but using double backslashes instead of the usual single backslash to separate each folder. Finally this is followed by another " (double quote). |
Item Separator |
,\n |
After each item except the last, a comma followed by a newline is added. |
Start Text |
array·=\n{\n |
The text generated at the start consists of the lines "array =" and "{". The small centered dot is simply a space character. Spaces are shown in this way so that they can be seen when editing these fields. |
End Text |
\n}·;\n |
This text is added after all the text generated for the items. This starts with a newline to end the line containing the final item, and is followed by the line "} ;". |